To install a bathroom faucet, first, turn off the water supply and remove the old faucet. Then, follow the manufacturer’s instructions to attach the new faucet securely.
Installing a bathroom faucet can seem daunting, but it’s a straightforward task that you can tackle yourself. This project not only improves your bathroom’s aesthetics but also enhances functionality. A new faucet can save water and provide a better flow.
Whether you’re upgrading an outdated fixture or replacing a broken one, understanding the installation process is essential. With the right tools and a bit of patience, you can achieve professional results without hiring a plumber. This guide will walk you through each step, ensuring your new faucet is installed efficiently and correctly. Let’s get started on transforming your bathroom!
Introduction To Bathroom Faucet Installation
Installing a bathroom faucet can seem daunting. With the right guidance, you can do it yourself. A proper installation ensures efficiency and prevents leaks. This guide simplifies the process for everyone.
Importance Of A Proper Installation
A well-installed bathroom faucet offers several benefits:
- Leak Prevention: Proper installation reduces the risk of leaks.
- Water Efficiency: A correctly fitted faucet saves water.
- Longevity: Good installation extends the faucet’s life.
- Aesthetic Appeal: A neat installation enhances your bathroom’s look.
Tools And Materials Needed
Gather the following tools and materials before starting:
| Tools | Materials |
|---|---|
| Adjustable Wrench | New Faucet |
| Screwdriver | Plumber’s Tape |
| Bucket | Washers and Nuts |
| Rags | Flexible Supply Lines |
Having the right tools makes the job easier. Make sure to check your faucet’s manual for specific requirements.
Choosing The Right Faucet For Your Bathroom
Choosing the right faucet transforms your bathroom’s look and feel. It enhances functionality and style. Understanding the options available helps you make the best decision.
Types Of Faucets
- Single-Handle Faucets: Control both hot and cold water with one lever.
- Double-Handle Faucets: Separate handles for hot and cold water.
- Wall-Mounted Faucets: Installed on the wall, saving counter space.
- Vessel Faucets: Tall faucets designed for vessel sinks.
- Touchless Faucets: Use sensors for hands-free operation.
Factors To Consider
| Factor | Description |
|---|---|
| Style | Match faucet design with your bathroom decor. |
| Finish | Choose from chrome, brushed nickel, or oil-rubbed bronze. |
| Installation Type | Ensure compatibility with your sink type and layout. |
| Budget | Prices vary. Set a budget before shopping. |
| Water Efficiency | Look for low-flow options to save water. |
Consider your bathroom’s overall style. Pick a faucet that complements it. Evaluate the finish and installation type. A clear budget helps narrow down choices.
Focus on water efficiency. This choice benefits the environment and your wallet.
Preparing For Installation
Installing a bathroom faucet can seem challenging. Proper preparation makes it easier. Follow these steps to ensure a smooth installation.
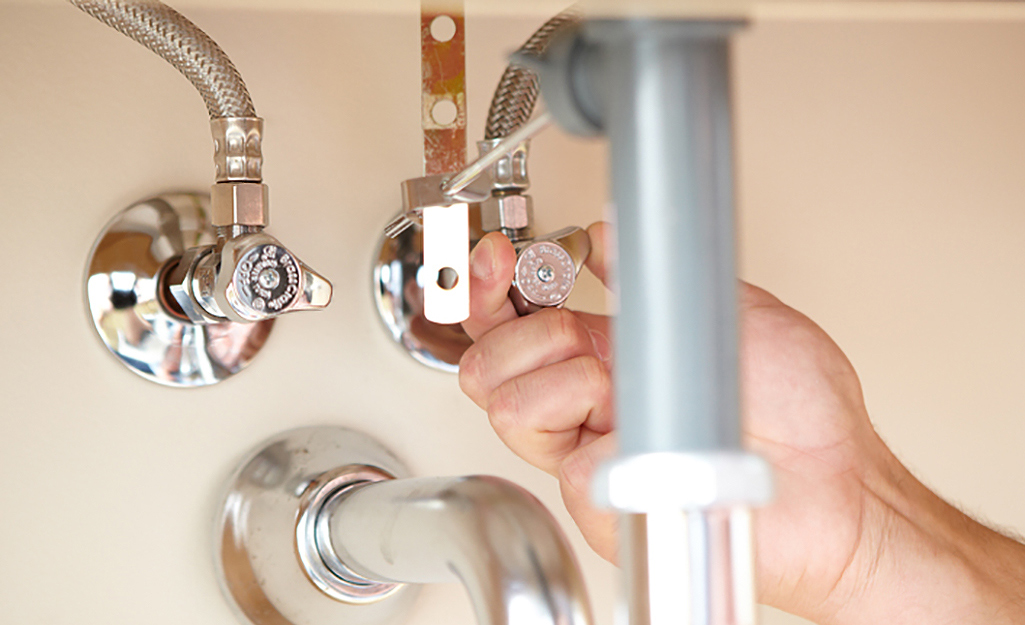
Shutting Off The Water Supply
Before starting, turn off the water supply. This prevents leaks and water damage. Locate the shut-off valves under the sink. Turn them clockwise until they stop.
- Check both hot and cold water valves.
- Flush the faucet to release any remaining water.
Use a towel to soak up any water left in the lines. This will keep your workspace dry.
Removing The Old Faucet
Next, remove the old faucet. Gather the necessary tools:
- Adjustable wrench
- Flathead screwdriver
- Bucket
Follow these steps to remove the old faucet:
- Place a bucket under the sink to catch water.
- Disconnect the water supply lines using the adjustable wrench.
- Remove the mounting nuts holding the faucet in place.
- Lift the old faucet out carefully.
Inspect the area for debris or old putty. Clean it before installing the new faucet.
Credit: www.finehomebuilding.com
Step-by-step Installation Process
Installing a bathroom faucet can seem daunting. Follow these simple steps to ensure a smooth process. You’ll have a new faucet ready in no time!
Positioning The New Faucet
Before you start, gather your tools. You will need:
- Adjustable wrench
- Screwdriver
- Plumber’s tape
- Bucket
- Rags
Now, let’s position your new faucet:
- Remove the old faucet. Use the wrench to unscrew it.
- Clean the sink area. Remove any debris or old sealant.
- Check the holes. Ensure they fit the new faucet’s base.
- Place the new faucet into position. Align it with the holes.
Connecting The Water Supply Lines
Next, connect the water supply lines:
- Locate the cold and hot water lines under the sink.
- Attach the supply lines to the faucet. Make sure to match hot to hot and cold to cold.
- Use plumber’s tape on the threads. This prevents leaks.
- Tighten the connections with the wrench. Do not over-tighten.
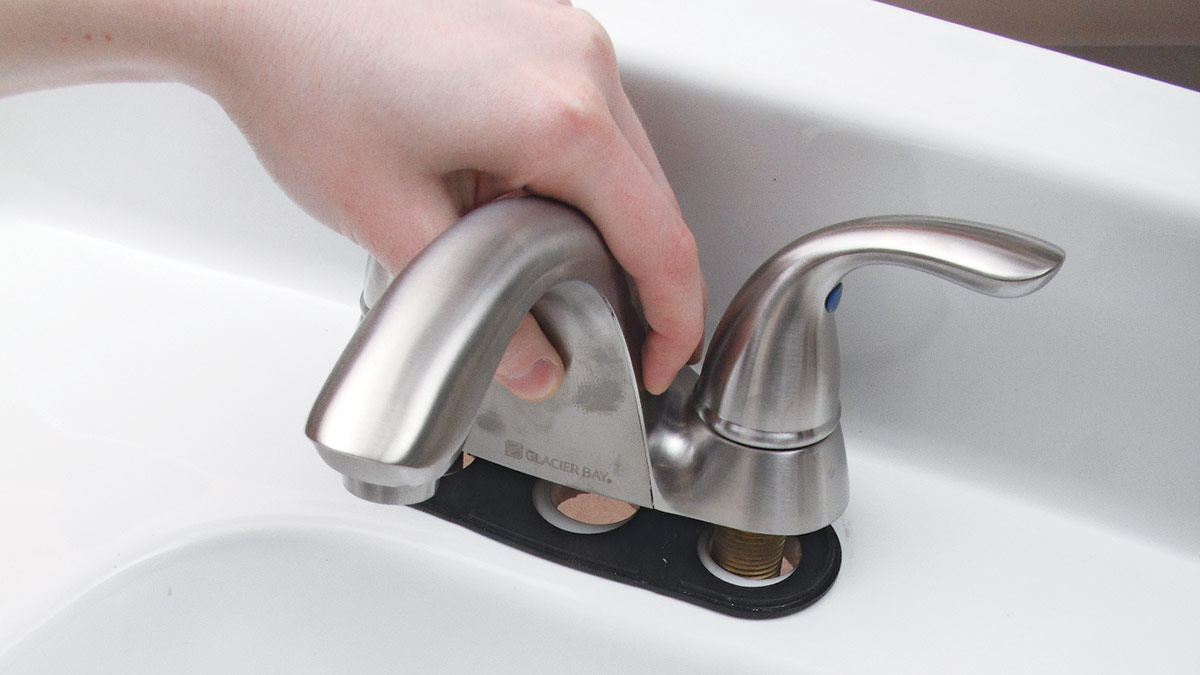
Securing The Faucet
Finally, secure the faucet:
- Check the base of the faucet. Ensure it sits flat against the sink.
- Use the mounting nuts provided. Screw them onto the faucet’s base.
- Tighten the nuts carefully. Ensure the faucet is secure but not too tight.
- Wipe away any excess plumber’s tape or debris.
Turn on the water supply. Check for leaks. Your new faucet is ready to use!
Sealing And Finishing Touches
After installing your new bathroom faucet, sealing is crucial. Proper sealing prevents leaks and water damage. This section focuses on applying caulk and rechecking connections.
Applying Caulk For A Watertight Seal
To ensure a watertight seal, follow these steps:
- Choose a high-quality silicone caulk.
- Clean the area around the faucet. Remove any dirt or old caulk.
- Apply a thin bead of caulk around the base of the faucet.
- Use a caulking tool or your finger to smooth the caulk.
- Allow the caulk to dry completely. This usually takes 24 hours.
Here are some tips:
- Wear gloves to keep your hands clean.
- Don’t use too much caulk. Less is more.
- Keep the workspace tidy for a better finish.
Rechecking Connections
After sealing, it’s time to recheck all connections. Follow these steps:
- Inspect the water supply lines. Make sure they are tight.
- Check the drain assembly. Ensure it is secure.
- Turn on the water supply slowly.
- Look for any leaks around the faucet.
- Test the faucet by running water. Ensure everything works well.
Remember these key points:
- Take your time. Rushing can lead to mistakes.
- Use a towel to wipe any spills immediately.
- Keep tools handy for quick adjustments.
Testing Your New Faucet
Once you have installed your new bathroom faucet, it’s time to test it. This ensures everything works properly. You want to check for leaks and smooth operation. Let’s dive into these important tests.
Checking For Leaks
Leaks can waste water and cause damage. Follow these steps to check for leaks:
- Turn on the water supply.
- Open the faucet completely.
- Look under the sink for any dripping water.
- Check the faucet base and handles.
Use a flashlight for better visibility. If you see any water, tighten the connections. If leaks persist, consider redoing the installation.
Ensuring Smooth Operation
Your faucet should operate smoothly. Here are some ways to ensure it works well:
- Turn the faucet on and off several times.
- Adjust the temperature settings.
- Listen for any strange noises.
Check the water flow. It should be steady and strong. If you notice any issues, inspect the installation. Make sure all parts are secured.
Maintenance Tips For Your Bathroom Faucet
Keeping your bathroom faucet in great shape is easy. Regular maintenance can prevent big problems. Follow these tips to ensure your faucet lasts longer and works better.
Regular Cleaning
Cleaning your faucet helps maintain its shine and function. Follow these simple steps:
- Use a soft cloth to wipe the faucet daily.
- Mix vinegar and water in equal parts for deeper cleaning.
- Apply the mixture to the faucet with a cloth.
- Rinse with water to remove any residue.
- Dry thoroughly to prevent water spots.
Regular cleaning prevents buildup and keeps your faucet looking new.
Addressing Leaks Early
Leaks can waste water and increase bills. Fixing them early saves time and money. Look for these signs of leaks:
- Water pooling under the faucet.
- Dripping sound when the faucet is off.
- Lower water pressure while using the faucet.
If you notice any of these signs, take action:
| Action | Description |
|---|---|
| Turn off water supply | Locate the shut-off valve under the sink. |
| Inspect washers | Check for wear or damage in the faucet’s components. |
| Tighten connections | Use a wrench to secure any loose parts. |
| Replace parts | Install new washers or cartridges if needed. |
Taking quick action on leaks can prevent costly repairs.
Credit: m.youtube.com
Troubleshooting Common Issues
Installing a new bathroom faucet can be exciting. Yet, problems can arise. Understanding common issues helps you resolve them quickly. This section covers two frequent problems: low water pressure and dripping faucets.
Dealing With Low Water Pressure
Low water pressure can make your faucet frustrating. Here are some steps to identify and fix the issue:
- Check the aerator. Remove it and clean any debris.
- Inspect the shut-off valves. Ensure they are fully open.
- Look for leaks in the supply lines. Repair any leaks found.
- Test the water pressure. Use a pressure gauge for accurate readings.
For persistent low pressure, consider these factors:
- Check for clogs in pipes.
- Evaluate the water source for issues.
- Contact a plumber if problems continue.
Fixing Dripping Faucets
A dripping faucet wastes water and can be annoying. Follow these steps to fix it:
- Turn off the water supply.
- Remove the faucet handle. Use a screwdriver for assistance.
- Inspect the washer and O-rings. Replace worn or damaged parts.
- Reassemble the faucet. Turn the water back on.
Consider these tips:
| Issue | Solution |
|---|---|
| Old or worn washer | Replace with a new washer. |
| Loose faucet parts | Tighten all components securely. |
| Corroded components | Replace corroded parts. |
Fixing a dripping faucet improves water usage and comfort.
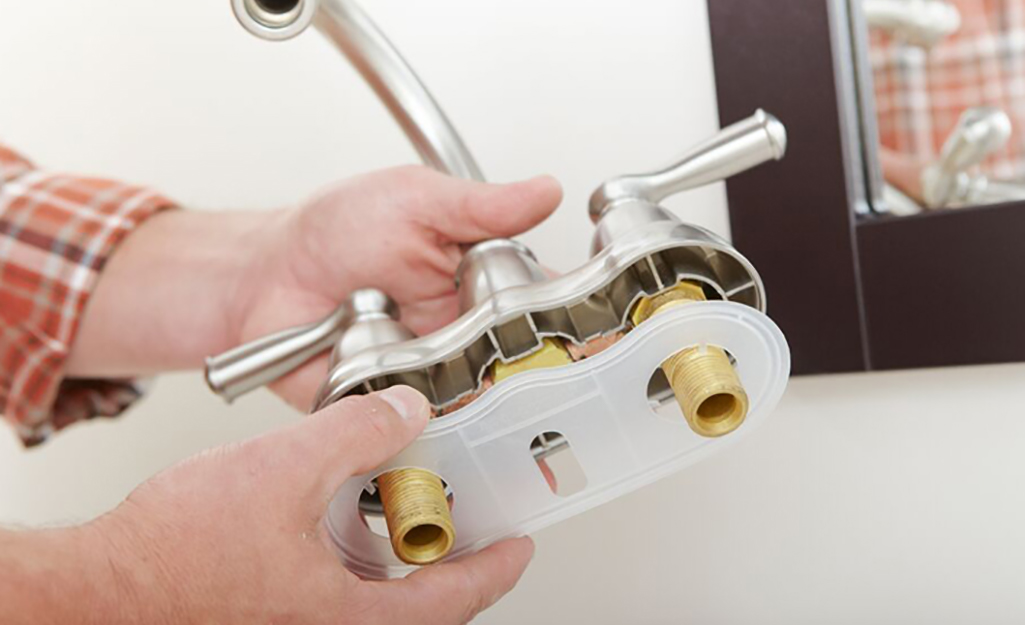
Credit: www.homedepot.com
Frequently Asked Questions
Is Installing A Bathroom Faucet Hard?
Installing a bathroom faucet can be straightforward for most DIY enthusiasts. Basic tools and some plumbing knowledge are helpful. Follow the manufacturer’s instructions carefully. While it may take some time, many find it manageable. Seek professional help if unsure or if complications arise during installation.
Do You Need Plumbers Putty To Install Bathroom Faucet?
Plumber’s putty is not always necessary for installing a bathroom faucet. Many faucets come with their own sealing washers. Use plumber’s putty if your faucet requires it, especially for sink drains. Always check the manufacturer’s instructions for specific guidance on installation.
How Do You Install A Faucet Step By Step?
1. Turn off the water supply. 2. Remove the old faucet. 3. Clean the sink area thoroughly. 4. Position the new faucet in place. 5. Secure it with mounting nuts. 6. Connect the water supply lines. 7. Turn on the water and check for leaks.
Can I Install A Faucet Myself?
Yes, you can install a faucet yourself. Make sure to gather the necessary tools and follow the manufacturer’s instructions. Turn off the water supply before starting. Check for leaks after installation. If unsure, consider hiring a professional for assistance.
Conclusion
Successfully installing a bathroom faucet can enhance both functionality and style. With the right tools and steps, this project is manageable for anyone. Remember to turn off the water supply and follow each step carefully. A little patience goes a long way.
Enjoy your newly installed faucet and the fresh look it brings!