To fix a bathroom faucet, first, turn off the water supply and drain the faucet. Next, disassemble the faucet, replace worn parts, and reassemble it.
A malfunctioning bathroom faucet can be a major inconvenience. Dripping faucets waste water and increase utility bills. Understanding how to fix a faucet can save you time and money. Regular maintenance keeps your faucet in optimal condition, ensuring reliable performance.
Common issues include leaks, low water pressure, and difficulty in turning the handle. With basic tools and a little patience, anyone can tackle faucet repairs. This guide will walk you through the essential steps to troubleshoot and fix your bathroom faucet effectively. Say goodbye to frustrating leaks and enjoy a fully functional faucet again.
Introduction To Diy Faucet Repair
Fixing a bathroom faucet is easier than you think. Many homeowners face common faucet issues. Tackling these problems yourself can save money and time. Let’s explore how to get started with DIY faucet repair.
Common Faucet Issues
Bathroom faucets can develop various problems. Here are some frequent issues you might encounter:
- Leaking faucet: Water drips from the faucet even when it’s off.
- Low water pressure: Water flows slowly or not at all.
- Rust or corrosion: Mineral buildup can affect performance.
- Strange noises: Hissing or banging sounds when using the faucet.
Identifying these issues early can prevent bigger problems. Regular checks help maintain your faucet’s health.
Benefits Of Diy Repairs
Choosing DIY faucet repair offers several advantages:
- Cost-effective: Save money on plumber fees.
- Time-saving: Complete repairs at your convenience.
- Skill development: Learn valuable handyman skills.
- Satisfaction: Enjoy the pride of fixing it yourself.
DIY repairs enhance your confidence. You can take charge of home maintenance. Every successful fix builds your skills for future tasks.

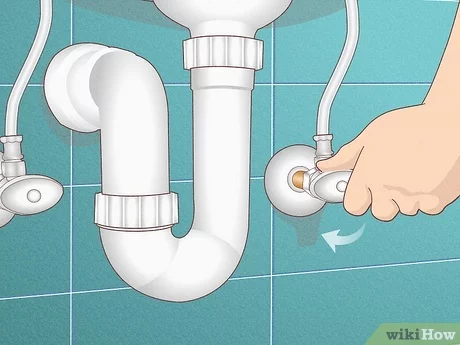
Credit: www.wikihow.com
Tools And Materials Needed
Fixing a bathroom faucet requires the right tools and materials. Having everything ready will save time. Gather your supplies before starting the repair.
Essential Tools
- Adjustable Wrench: Helps loosen and tighten nuts.
- Screwdriver: Needed for removing screws.
- Pliers: Useful for gripping small parts.
- Bucket: Catches any water spills.
- Towel: Keeps the area dry and clean.
- Flashlight: Illuminates dark spaces under the sink.
Helpful Materials
| Material | Purpose |
|---|---|
| Replacement Washer: | Seals leaks in faucets. |
| Plumber’s Tape: | Prevents leaks in threaded joints. |
| Silicone Sealant: | Helps seal gaps and joints. |
| Cleaning Supplies: | Removes mineral buildup. |
Gather these tools and materials. Being prepared makes the task easier. Fixing your faucet can be quick and simple.
Identifying Your Faucet Type
Knowing your faucet type helps fix it easily. Different faucets use different parts. Identify your faucet type before starting repairs. Here are the main types:
Compression Faucets
Compression faucets are the oldest type. They have two handles for hot and cold water. Each handle turns a screw to open or close the water flow.
- Common in older homes
- Easy to identify by the handles
- Requires regular maintenance
Cartridge Faucets
Cartridge faucets use a cartridge to control water flow. They can have one or two handles. These faucets are popular for their ease of use.
- Single handle for hot and cold
- Two handles for separate control
- Less prone to leaks than compression types
Ball-type Faucets
Ball-type faucets have a unique design. They use a ball mechanism to control water flow. This type usually has a single handle.
- Good for mixing hot and cold water
- Common in kitchen sinks
- Requires special tools for repairs
Disk Faucets
Disk faucets feature a flat, cylindrical design. They offer precise control over water flow. Usually, they have one handle for easy operation.
- Modern and stylish appearance
- Durable and long-lasting
- Often found in high-end homes
:max_bytes(150000):strip_icc()/how-to-replace-a-bathtub-faucet-5210836-10-6825223c1e75442187d5ab09690510d4.jpg)
Credit: www.thespruce.com
Shutting Off The Water Supply
Before fixing a bathroom faucet, shutting off the water supply is essential. This step prevents water from spilling everywhere. Follow these simple steps to ensure a smooth repair process.
Locating The Shut-off Valve
Finding the shut-off valve is your first task. It is usually located near the faucet. Check under the sink for two small valves.
- Look for a round or oval handle.
- Check for a lever-type valve.
- Ensure there are two valves: one for hot and one for cold water.
Turning Off The Water
Once you locate the valves, it’s time to turn them off. Follow these easy steps:
- Turn the hot water valve clockwise until it stops.
- Do the same for the cold water valve.
Check for leaks. Turn on the faucet to confirm water flow has stopped. This ensures a dry workspace.
| Valve Type | Direction to Turn |
|---|---|
| Hot Water Valve | Clockwise |
| Cold Water Valve | Clockwise |
With the water supply off, you can start fixing your faucet. Enjoy a mess-free and safe repair process!
Step-by-step Repair Guide
Fixing a bathroom faucet can save time and money. Follow these simple steps to repair your faucet effectively.
Removing Faucet Handles
Start by turning off the water supply. Locate the shut-off valve under the sink. Turn the valve clockwise to stop water flow.
Next, use a screwdriver to remove the screws holding the handles. If there are no visible screws, check for a decorative cap. Pry it off gently with a flathead screwdriver.
Once the screws are removed, pull the handles straight up. Be careful not to force them, as this can cause damage.
Inspecting For Damage
After removing the handles, examine the faucet parts. Look for cracks or wear in the cartridge and O-rings. These are common trouble spots.
Check the washers and seals for signs of damage. A damaged part can lead to leaks or poor water flow.
Use a flashlight for better visibility. Make sure everything is clean and clear of debris.
Replacing Faulty Parts
Identify any damaged parts that need replacement. Common replacements include:
- Cartridge
- O-rings
- Washers
- Seals
Purchase replacements from a local hardware store. Ensure they match your faucet model.
Install the new parts by following the reverse order of removal. Make sure everything fits snugly.
Finally, reattach the handles and secure them with screws. Turn the water supply back on and check for leaks.
Fixing Leaks
Leaky faucets can cause waste and increase water bills. Fixing leaks is important for efficiency. This section covers simple steps to address leaks effectively.
Addressing Leaky Faucets
Start by identifying the source of the leak. Look closely at the faucet body, spout, and connections. Common causes include:
- Worn-out washers
- Loose parts
- Corroded components
To fix the leak:
- Turn off the water supply.
- Remove the faucet handle.
- Inspect washers and O-rings.
- Replace any damaged parts.
Tightening Connections
Loose connections often lead to leaks. Tightening them can solve the problem quickly.
Follow these steps:
- Check the handle screws.
- Examine the mounting nuts.
- Use a wrench to tighten loose connections.
Be careful not to over-tighten. This can damage components.
Sealant Application
Sometimes, leaks occur due to gaps in fittings. Applying sealant can help.
Use the following steps:
- Clean the area around the leak.
- Apply plumber’s tape or sealant.
- Reassemble the faucet.
Check for leaks again after applying sealant. This ensures a tight fit and prevents future leaks.
Reassembling And Testing Your Faucet
Reassembling your bathroom faucet is crucial for proper function. Follow these steps to ensure everything is back in place. Testing afterward will confirm that your faucet works correctly.
Reattaching Parts
Start by gathering all the parts you removed. Make sure everything is clean and ready to go. Follow these steps:
- Align the valve cartridge with the faucet body.
- Push the cartridge down gently.
- Reattach the retaining clip or nut securely.
- Replace the handle and tighten the screw.
- Put back any decorative caps.
Turning On Water Supply
After reattaching all parts, it’s time to turn the water back on. Follow these steps:
- Locate the water supply valves under the sink.
- Turn the valves counterclockwise to open.
- Check for any unusual sounds.
Checking For Leaks
Leak testing is essential to ensure everything is sealed. Follow these steps:
- Turn on the faucet and let the water run.
- Inspect all joints and connections.
- Look for any water dripping or pooling.
Make adjustments if you notice any leaks. Tighten connections as needed. Keep checking until everything is secure.
Credit: homerepairtutor.com
Maintenance Tips
Maintaining your bathroom faucet is crucial for its longevity. Regular upkeep prevents leaks and ensures smooth operation. Follow these simple maintenance tips to keep your faucet in top shape.
Regular Cleaning
Cleaning your faucet regularly helps prevent build-up. Use these steps for effective cleaning:
- Use a soft cloth or sponge.
- Apply a mixture of vinegar and water.
- Wipe down the faucet body and handles.
- Rinse with clean water.
- Dry thoroughly with a clean cloth.
Regular cleaning helps maintain shine and prevents corrosion.
Periodic Inspection
Inspect your faucet every few months. Look for signs of wear or damage:
- Check for leaks around the base.
- Inspect the handles for smoothness.
- Look for mineral build-up on aerators.
- Ensure all screws are tight.
Performing these inspections keeps your faucet functioning well.
When To Call A Professional
Some issues require expert help. Call a professional if you notice:
- Persistent leaks that won’t stop.
- Strange noises when using the faucet.
- Low water pressure that persists.
- Corrosion that affects performance.
Seeking professional help ensures proper fixes and safety.
Frequently Asked Questions
How To Stop A Bathroom Faucet From Dripping?
To stop a bathroom faucet from dripping, first turn off the water supply. Remove the faucet handle and check for worn washers or O-rings. Replace damaged parts and reassemble the faucet. Turn the water supply back on and test for leaks.
Regular maintenance prevents future drips.
Why Does My Faucet Keep Dripping?
A dripping faucet often results from a worn-out washer or O-ring. Mineral buildup can also cause leaks. Loose parts or a damaged valve might be culprits too. Regular maintenance can help prevent further issues and save water. Consider consulting a plumber for persistent problems.
How To Fix A Broken Bathroom Sink Faucet?
To fix a broken bathroom sink faucet, first turn off the water supply. Remove the handle and unscrew the faucet. Check for damaged parts like washers or cartridges. Replace any broken components and reassemble the faucet. Finally, turn the water supply back on and test for leaks.
How Do You Fix A Faucet Step By Step?
To fix a faucet, first, turn off the water supply. Remove the handle and unscrew the packing nut. Replace washers or O-rings as needed. Reassemble the faucet and turn on the water supply. Check for leaks and test the operation.
Adjust as necessary for proper function.
Conclusion
Fixing a bathroom faucet is a manageable task for anyone. With the right tools and steps, you can save money and enhance your home’s functionality. Regular maintenance can prevent future issues. Don’t hesitate to tackle this project. Your bathroom will thank you for it, and you’ll gain valuable DIY experience.